Friday, July 27, 2012

Painting the intake

The aluminum Edelbrock intake started to yellow out, so I decided to paint it Pontiac engine blue (to match the engine). Results came out positive.

Also, the alternator brackets that were painted silver were starting to get messy, so I decided to paint them black to match the other brackets.

Prep Work


Finished Product 


Thursday, July 26, 2012

Restoring Paint with Meguire's #7 Show Glaze

I came across this post: How to Restore Single Stage Paint by Mike Phillips, where he explains his method for restoring old paint. I decided to give it a whirl and the results are magnificent! While my car will need a repaint in the near future, this has given some life back to my current paint.


My technique: I used Meguire's Quick Detail spray to clean, then Meguire's clay bar. I then applied a thick wet layer of Meguire's #7 Show Glaze, which I left overnight. In the morning I rubbed off the glaze, applied another layer, and finally used Eagle One Carnuba Wax to seal the deal.


Results below:


Saturday, July 21, 2012

Kustom Headlight Bezels

My original headlight bezels have been pitting and the chrome deteriorated several years ago. To combat this, I originally painted them in a chrome paint. This paint failed after 2 years. 


Plan B: Paint the bezels in a color similar to my body paint. This is how Cadillac had their bezels back in 1966.


I used Duplicolor (Ford) Redfire Pearl Metallic, which looks almost exactly like my paint color.


Final Product

Monday, July 2, 2012

Murder Out the Wheels

The black paint on the wheels needed a refresh. I also decided to remove the trim rings for a darker effect. Painted with Rustoleum Satin Black.


Fixing the Hood

I stripped the hood down to bare metal and found the two front corners were completely rusted through. To fix this, we cut out the bad metal and welded in brand new metal.

Many dents were found in the hood, and some of them were fixed by hammering them out from underneath. Others were body filled into place. It took a week of filling and sanding, then finally painting, but the hood looks absolutely smooth. In order to not make it look completely out of place, the hood was painted flat black for the time being.

Painted with Duplicolor Paint Shop brand paint - 3 coats primer, 3 coats Jet Black, 3-4 coats Matte Clear.


Sadly some pictures have gone missing, so I cannot give a look into the whole process.


Thursday, May 31, 2012

Rear Suspension Upgrade

Rear suspension upgrade is complete!

Control arms were removed, cleaned, and painted Rustoleum Satin Black.
Energy Suspension rear bushing kit was installed.
Lower control arms were boxed using Ames insert
Summit 1" rear sway bar installed

This job was quite simple, while the removal required a lot of effort, the installation was easy and almost painless. Now my suspension is completely finished with new bushings.


Friday, May 18, 2012

Front Suspension Finished

Here are pictures of the front installed.


(click for more)

Friday, April 6, 2012

Spring 2012 Upgrades

On the list for this year is suspension and exhaust. 


Suspension:
PSC Front end rebuild kit:


    • Upper Control Arm Bushings
    • Lower Control Arm Bushings
    • Sway Bar Bushing Kit with Brackets
    • End Link Kit Inc. Bushings and Hardware
    • Polyurethane Tie Rod Boots
    • Polyurethane Ball Joint Boots
    • Upper Control Arm Bumpers
    • Lower Control Arm Bumpers
    (These bushings are all Energy Suspension)


Summit 1 5/16" front sway bar
Summit 1" rear sway bar
Performance Years rear control arm box kit (to be welded in place)
Energy Suspension rear bushing kit


I will reuse the rest of my oem parts - they are going to be stripped, cleaned, and painted red.


Exhaust:
Pypes SGA10  X-pipe header back exhaust system
Thrush glasspacks
Pypes Slant Cut exhaust tips

Friday, August 12, 2011

Electrical Nightmare

Lately I noticed all my lights will flicker at night. It seems to happen when the car is in gear idling, and my foot is on the brake.

I've been on a hunt to fix this problem -
  • Tightened the loose nut behind the volt meter
  • Replaced AC Delco mechanical voltage regulator with Transpo solid state voltage regulator
  • Reground the entire car - Headlights, new NAPA engine ground strap, tail light housings to body, gauge pod to dash, added star washers under all grounds
  • Found out my alt was going bad (and was too small - 30A). Replaced with a Quality 61A
  • Raised the idle up 100 RPM
  • Nut on starter was WAY loose and started sparking against the body. Tightened up the connection
The next step is going to be checking out the rear lights and seeing if one of them is not grounding properly. I'll keep posting until I find the problem.

Feel the Breeze!

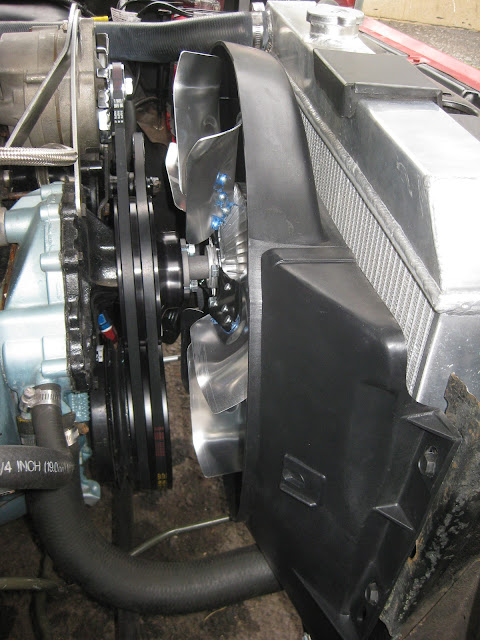
Pontiacs are plagued with heating issues. After the heat started to get unbearable, I decided to install a shroud and stock clutch fan. Now the car stays at a crisp 195 degrees, and you can feel a LOT of air pass through the grill. Note: Flex-a-lite flex fans are the worst, and should not be used.


Wednesday, July 20, 2011

Hood Painting

The paint job on the GTO has hit its expiration. I decided to paint the hood in order to fix the major problems that COULD happen if I left the paint chipping off. Very simple job, Duplicolor Paint Shop primer, gloss black, and matte finish clear coat. Here is the job:


Sanded down to bare metal


Primered


Duplicolor Gloss Black


Duplicolor Matte Finish Clear Coat


On the car


Tuesday, May 24, 2011

Ram Air Hood Chrome

Took a few hours to shine this up:


Now it has to be removed to I can paint the nostrils black.

Thursday, May 19, 2011

New steering wheel and Stewart Warner tach

Took out the original Pontiac Rally clock and installed a stewart warner gauge. Also installed a new 15" steering wheel


Saturday, May 14, 2011

Console installation

Installed the console. Top plate still needs to be created. Here are pics:


Saturday, May 7, 2011

Car show season is here!

Finally warm weather allows me to work on the car again.

1. Last weekend, installed OEM Pontiac rear "heavy duty" wagon springs. This weekend, took out my Moog front springs and removed half a coil. The effect:


Rear raised 2", front dropped 2". The rake looks pretty mean without being overly aggressive.

2. Some tuning needed to be done on the carb - there is a nasty bog, and the car needed to warm up to 180 before it could even be put in drive.
  • Replaced accelerator pump with 10cc upgrade
  • Backed timing off
  • Tuned idle

Things should be straightened out now. Will start the car tomorrow to see how it goes.

3. Trunk woes
Trunk had several rusted holes along with being pretty rusty. Sanded down the rust, welded in some replacement panels, and put down a layer of primer. Next step is to speckle-paint the whole trunk.

Thursday, November 4, 2010

Winter is here!

Car show season is over. The plan was to update the suspension over the winter, but that is put to the side, because I brought home this beautiful Pontiac:

2001 Pontiac Trans Am WS6!

Currently working on putting a console in the GTO. I took apart the console, sanded it down, and repainted.

Paint used: Duplicolor Satin Black (on both metal and plastic)

Console before resto

Sand and strip the main top

Painted


Painted body

Glove box door

Sanded glove box (felt was dirty and ragged)

To use the B&M shifter, I had to create a stand, placed under the console.

To enclose the top, we have 2 options -
1. A solid sheet of black plexiglass
2. A curved sheet of plastic, heated and curved to the shape of the B&M shifter enclosure. I will report on which we use.

Sunday, September 5, 2010

Custom mirrors

Installed 71-81 GM sport side mirrors on the car. It looks good and fitting. They also don't move when the cover is put on the car (since the mirror is inside the shell and not outside on a swivel).

Saturday, August 21, 2010

Too much power!

1. The engine torqued itself so hard the transmission crossmember ripped out of the frame.
Installed:
G-Force reinforced crossmember that bolts to the frame
Energy Suspension transmission mount

2. Sanded the hood to remove the cancer. Paint matches pretty well.

From:

To:


3. New wheels - 15x7 Rally II's with 235/60R15 Firestone Firehawk Indy 500s


Sunday, July 25, 2010

On the road

Got out to 2 car shows last week.

On the way back from Rahway, then power went out. Seems like the ignition terminal was look and we lost the circuit. Today:
- fixed that
- ended up taping 2 unrelated wires
- installed RobbMc mini-starter
- tuned the choke
- installed Optima battery

Sunday, July 11, 2010

Engine is installed in the car

The engine is now back in the car!

Tomorrow is final prep, wiring, piping, fluids... then I *should* be turning the key.

Pic of assembly before going in the car: